• LOGIN
  • No products in the basket.

Ultimate First Aid Guide For Pet Owners

Accidents and emergencies happen, and pet parents don’t want to watch their furry family members in misery. Unfortunately, it isn’t easy to know what to do in the heat of the moment. Understanding basic pet first aid methods is the finest thing you can do for your pet.

It’s all part of being a good pet parent, and it could even save your pet’s life. 

Table of Contents

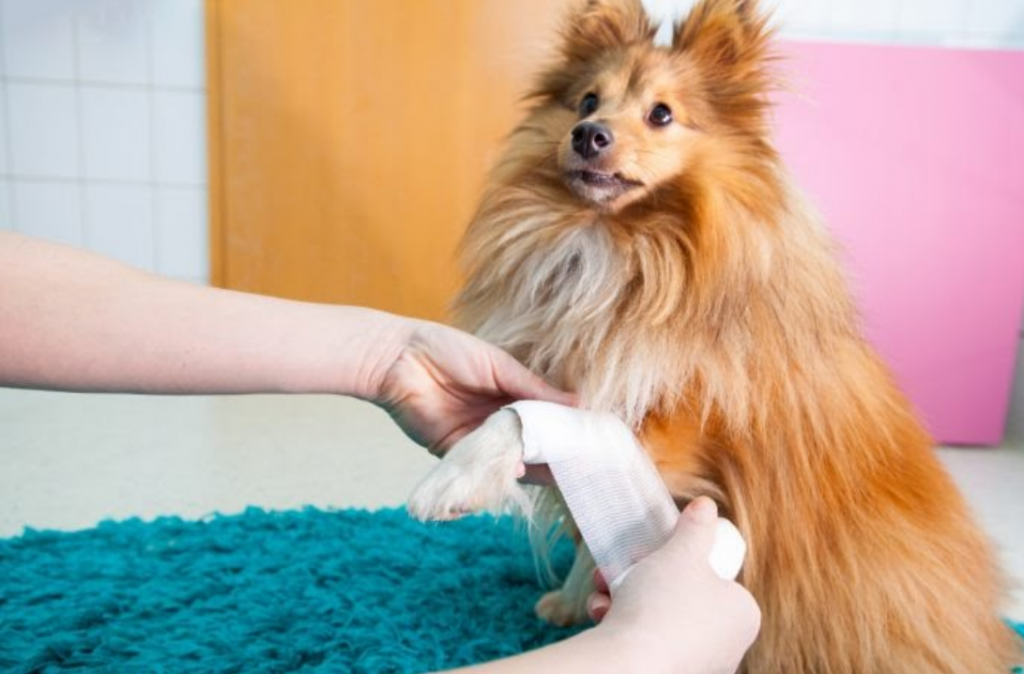
Limb injuries and fractures

If a limb has been injured, your pet may limp and whine. A muscle or tendon damage, a fracture, or dislocation could be the cause. If your pet appears to be in pain after an injury, it’s a good sign that something isn’t quite right. 

What you should do:

1. If required, use a muzzle on your pet. If a dog refuses to let you do this, don’t press the issue further because frightened dogs may bite when muzzles are applied.

2. If the fracture is open, carefully cover it with clean gauze or a towel and fasten the bandage. Apply no ointment to the open wound. Before administering any medication, it’s preferable to wait until the veterinarian analyses the injuries.

3. If you sense a broken bone, use something solid to brace the limb, such as a rolled-up magazine, and secure it gently with wrapped gauze or elastic band. Wrap the injury tightly but not too tightly to avoid restricting blood flow; it should be firm, not tight. Don’t force your pet to wear this improvised leg splint if it doesn’t like it. Without anaesthetic, manipulating a fractured limb can be excruciatingly painful.

4. To keep your pet warm, wrap them in a blanket or towel. To safely transport them into your vehicle and to a veterinarian, use a stretcher (flat board or blanket). 

External Bleeding 

Common injuries that induce bleeding include scrapes, bites, scratches, and ripped claws. The signs and symptoms of external bleeding are pretty clear. There will be blood dripping from the skin, which may become entangled in the fur. There could even be a trail of drops or stains on the ground. 

What you should do:

1. If required, use a muzzle on your pet.

2. To eliminate any debris or pollutants, flush the wound with water or an antiseptic solution suitable for animals. Unless told otherwise, leave wound cleaning to your veterinarian if the incision is particularly deep.

3. Using a clean cloth or gauze, apply pressure to the cut until the bleeding stops. Remove the damp gauze and replace it with a new sterile bandage if the wound is mild. Secure it and contact your veterinarian for advice on what to do next as soon as possible. To stop bleeding from nails that have been trimmed too short and have started to bleed, apply styptic powder or cornstarch.

4. If the bleeding is moderate, it may take several minutes to stop. If blood seeps through the cloth, replace it and continue to apply pressure. Once your pet has been stabilised, rush to your veterinarian or the nearest emergency veterinary facility for examination and treatment options. Further flushing and antibiotic therapy may be required if the wound is deep.

5. A tourniquet can be put between the wound and the body while applying pressure on the wound for excessive bleeding on a limb. It needs to be loosened for 15-20 seconds every 15-20 minutes and then reapplied. A tourniquet should only be used as the last option on a limb or tail because it might cause permanent harm or loss.

Excessive, uncontrollable bleeding is life-threatening, and you should take your pet to the vet right away.

Internal Bleeding 

Your pet might be bleeding on the inside if they were hit by a car or fell from a great height. Internal bleeding can be harder to spot because the signs aren’t as prominent or evident as external bleeding. The following are some warning indicators to look out for: 

  • pale gums
  • bleeding from the nose or mouth
  • blood in the urine
  • rapid heartbeat
  • weakness
  • collapse
  • coughing up blood

This is a dangerous condition that should be treated by a veterinarian very away.

What you should do:
  1. Make sure your pet is ready to be transported to a veterinarian. If necessary, use a stretcher (a flat board or blanket).
  2. On the drive to the clinic, it’s critical to keep your animal as calm and quiet as possible.

Burns 

Electrocution, chemical exposure, and hot liquids or objects are all major causes of pet burns. If a limb has been burned, the animal will display signs of pain and discomfort by whining or even hobbling. Depending on the intensity, the skin may seem red but intact (first-degree), or there may be a partial or complete loss of numerous layers of skin (second-degree and third-degree). If the burn is severe and covers a significant region of the body, your pet may go into shock, which is a life-threatening condition.

What you should do:

1. If required, use a muzzle on your pet.

2. Applying creams or ointments to the burn is not recommended.

3. Cool the burn down with a slow trickle of cold water in the shower for less severe burns from hot fluids, hot objects, or electrocution (switch off electricity or power to equipment before reaching the animal).

4. Apply a cold compress using a clean, moist, and cool washcloth for no more than 10 minutes after rinsing (avoid using ice). Apply a non-stick bandage to the burn and contact your veterinarian for further instructions. Professional help may be required depending on the severity of the burn.

If a chemical has burned your pet, wear gloves to protect your hands while tending to their wound. Rinse the area with cold water for 15-20 minutes after removing any collars or accessories that may contact the chemical. Cover the burn with a non-stick bandage and contact your veterinarian for further instructions and treatment options.

Multiple layers of skin are involved in second and third-degree burns, making them more dangerous. These burns require immediate veterinarian attention and may cause your dog to become disoriented. Cover the wound with clean, dry gauze that will not stick to it. Stabilize your pet and take them to your veterinarian or an emergency veterinary hospital as soon as possible.

Choking 

Curious pets can find themselves in a lot of trouble by chewing on things they shouldn’t. If your pet exhibits these symptoms, it may be choking. Coughing and gagging sounds, difficulty breathing, pawing at their mouth, and blue colouring of the gums and tongue are all signs of choking. 

What you should do:

1. If your pet’s mouth can be safely opened, do it with caution. It’s a good idea to have someone else hold the animal while you check its mouth.

2.If possible, look into the mouth and gently remove the thing. Make sure it doesn’t go any further down the throat. If you can’t safely remove the object, you’ll have to choose between performing a dislodging manoeuvre or taking your pet to a nearby veterinarian or emergency veterinary hospital right away.

3. Hold a small dog or cat erect with their back against your chest while attempting a dislodging manoeuvre. Place one hand in a clenched fist below the sternum, with the thumb against the abdomen and the other hand on top of your fist. To drive air out of the lungs, make five thrusts in and up toward their head. Swipe their mouth to see if the thing has gotten loose.

4. Stand behind a big dog and wrap your arms around its abdomen to dislodge an object. Place one hand in a closed fist beneath the rib cage below the sternum, thumb against the stomach, and the other hand on top of the fist. To drive air out of their lungs, make five thrusts up and forward toward their head. Swipe their mouth to see if the thing has gotten loose.

5. Repeat the process until the object is free or on a veterinarian’s way.

Pet First Aid Level 3
This instructor-led course will demonstrate how to perform life-saving treatments such as animal CPR and treat minor injuries and accidents.
Pet First Aid Level 3
This instructor-led course will demonstrate how to perform life-saving treatments such as animal CPR and treat minor injuries and accidents.

Intake of harmful substances

Chemicals, toxic food, clothing, small toys and plants can be harmful to our animals, but sometimes the best of curiosity is. Some symptoms may include lethargy, vomiting, diarrhoea, convulsions, breathing difficulties and loss of consciousness. These signs can be helpful if you are unsure whether they have taken anything harmful.

What you should do:

1. Contact your veterinarian or the Animal Poison Control Center immediately if you know your pet has taken something dangerous. The more you can tell your pet what they have ingested and help your contact give you the best advice when they are taken. You may need to seek immediate professional attention depending on the circumstances.

2. Foreign bodies such as toys, socks and screws can require surgical removal. X-rays or ultrasounds can assist in identifying objects and in determining the best course of action for your veterinarian.

3. Ensure that harmful chemicals and food are safe and unavailable to animals in and around the home. Educate yourself on plants to avoid plants that could be harmful to your pet in your yard. 

Heatstroke

Animals, like people, are susceptible to overheating. There are ways to prevent heat, and the majority of them are common sense. If you find that your pet pants throw air, find it hard to walk or collapse, heat strokes can affect you.

What you should do:

1. The first step is to start to calm your pet down slowly.

2. Put your pet in a bath and start cooling them with water at room temperature. It is best not to fill the tub because your pet may lose awareness and fall. Do not use ice or icy water because blood vessels are too quickly restricted. Make sure the bottom and inside of the legs are wet thoroughly.

3. Check the temperature of your pet. The body temperature of a dog is between 99°F and 102.5°F, and a cat ranges between 100°F and 102.5°F. As your pet’s temperature is closer to 106°F and 107°F, it is extremely dangerous and requires immediate medical attention.

4. After you have cooled your pet significantly, bring it immediately to your veterinarian. An animal with heatstroke can go down without treatment quickly.

Heatstroke prevention is the best thing you can do. Even on warmer days, do not leave your animal in a car. Know the tolerance of your pet when it’s hot outside. Keep it in a cool shady area or hot days inside, ensuring your pet always has access to freshwater. For dogs with a brachycephalic nose, avoid outdoor activities during the summer. Dogs such as pugs, French bulldogs and Boston terriers can’t breathe or pant efficiently in hot weather to keep cool.

Shock

After a severe trauma like hitting a car or burning, your pet may become shocked. When the body becomes in shock, it doesn’t get enough oxygen because of the reduced blood flow to the inner organs. Shock is life-threatening, and medical attention is needed immediately. Shock symptoms include depression, pale and cool gums, rapid heart rate, faint breathing, weak pulse, low body temperature and glossy looks.

What you should do:

1. Due to the seriousness of the situation, your main goal should be to transport your pet to the nearest vet or emergency veterinary hospital.

2. Place your pet on their side, head lower than the rest of their body. To keep them warm, wrap them with a blanket or towel. To minimise more issues, make sure they are as quiet as possible.

3. To get them into your car and transferred for treatment, use a stretcher (flat board or blanket).

Not Breathing 

It’s frightening and frustrating to discover your pet isn’t breathing. Apnea, or not breathing, is indicated by pale gums and no movement of the chest. Your pet is in danger if they do not have access to oxygen.

What you should do:

1. To best assist your pet, remain as calm as possible. While you’re caring for your pet, it’s best to have someone nearby contact a veterinarian.

2. First, gently pull your pet’s tongue forward to look for any foreign objects that may obstruct their airway. If an object is blocking their airway, follow the actions outlined under “Choking” above.

3. Keep an eye out for a heartbeat. If there isn’t a heartbeat, see the “CPR” section below.

4. It’s now time to start performing rescue breathing. With one hand, seal your pet’s mouth and breathe directly into their nostrils with the other until you see their chest rise. Every 30 seconds, continue to give a breath.

5. Perform rescue breathing until your animal regains consciousness or you reach a veterinarian’s office or an emergency veterinary hospital.

Even if your animal starts to breathe normally again, seek guidance from your veterinarian.

CPR

CPR is required if your animal is unconscious, not breathing, has no pulse, and has pale gums.

What you should do:

1.  To begin, make sure your pet’s airway is clean, and you’ve started rescue breathing by following the steps in the “Not breathing” section above.

2. Place your pet on their right side on a hard surface. Place one hand’s heel directly over the heart (behind the front left elbow), then the other hand on top of the first. Use one hand around the chest with your thumb under their left elbow and your fingers under their right elbow for little dogs and cats with tiny chests.

3. Compress your pet’s chest at a 100-120 compressions rate per minute, compressing 1/3 to 1/2 times the width of their chest. With each compression, let the chest return to its original position. You may get a good indication of how quick the rhythm should be by pounding your chest to the beat of the Bee Gees’ “Stayin’ Alive” (or even a little faster).

4. Every 30 seconds, give a rescue breath. With each breath, let the chest fully rise and fall.

5. Continue compressions and rescue breathing every two minutes, checking for a heartbeat. If you’re able, take shifts with another person so you can rest. CPR can be exhausting.

6. Until you reach the veterinarian’s office or an emergency veterinary hospital, continue CPR.

Even if your animal’s heartbeat and breathing recover, seek guidance from your veterinarian.

Become certified in first aid for pets

Earn a certification in first aid for your pets to take your preparation one step further with our Pet First Aid and CPR Level 3 course. 

Please keep in mind that basic aid does not replace veterinarian care. While the procedures you undertake on your pet may save their lives, they should be followed up with veterinary care as soon as possible.

Pet First Aid and CPR Level 3
This course, you will learn how to deal with common first aid emergencies in animals, familiarising yourself with the first aid kit’s contents and learning best practices used by trained vets.
Pet First Aid and CPR Level 3
This course, you will learn how to deal with common first aid emergencies in animals, familiarising yourself with the first aid kit’s contents and learning best practices used by trained vets.

Recent Posts

July 17, 2023

0 responses on "Ultimate First Aid Guide For Pet Owners"

Leave a Message

Your email address will not be published. Required fields are marked *

Template Design © VibeThemes. All rights reserved.

Setup Menus in Admin Panel